Wednesday, November 30, 2011
Revision of Interest Rates and Various Changes in SB Rulings (w.e.f. 01/12/2011)
IMPORTANT INFORMATION
The patch can be executed only after day-end of 30/11/2011
It can be executed on the server or on any one of the client systems running a 32 bit Operating system in which DBAnalyzer is installed
The patch does not require SQL ‘SA’ password for execution and hence can be run by any official working on systems or by the supervisor
Supervisor has to ensure the execution of the patch before commencing counter operations on 01/12/2011.
The patch does NOT incorporate the following points, and hence and in cases where it becomes applicable the changed rule has to be implemented manually.
The maturity period for Monthly Income Scheme (MIS) and National Savings Certificate (NSC) will be reduced from 6 years to 5 years – problem will not arise at present.
New NSC instrument, with maturity period of 10 years introduced is to be handled manually.
The change in rate of interest in case of TD premature closure will have to be done manually till the requisite changes are made.
INSTRUCTIONS FOR RUNNING THE PATCH
Download the ‘MoF_RateChange.zip’, unzip and copy it to the DBAnalyzer folder
Run ‘MoF_RateChange.exe’ from the DBAnalyzer folder itself.
Enter the name of the SB Server and click ‘OK’.
A message will be displayed for each scheme.
Continue clicking on ‘OK’ until the message ‘Interest rates updation completed successfully’ is displayed.
In case any other message or error code is displayed, email the error code to SDC for solution.
Click here to download Patch
In SQL 2008 when we fetch counter articles
In SQL 2008 when we fetch counter articles in Speednet sometimes we may get one error that "Counter Articles not found if your using SQL 2005 please refer readme".
This error is due to Surface Area Configuration of SQL . To solve this problem please run following query
sp_configure 'show advanced options',1
go
reconfigure
sp_configure 'Ad Hoc Distributed Queries',1
go
reconfigure
Tuesday, November 29, 2011

Remove row editing limitation in SQL2008

To modify the “Edit Top 200 Rows” or “Select Top 1000 Rows” settings do the following:
1.Run the SQL Management Studio Express 2008
2.Click the Tools -> Options
3.Select SQL Server Object Explorer . Now you should be able to see the options
*Value for Edit Top Rows Command
*Value for Select Top Rows Command
4.Give the Values 0 here to select/ Edit all the Records


Net Send made easy.
 To send message to the client computers in the LAN, the following command can be used.
net send dtc1 hello
(dtc1 is the receiver and hello is message)
Here is a tool to send messages through net send function easily. For working this NetSend, the messenger service must be running.
To check Messenger service,Click Start-Run Type services.msc and hit enter.
 If the service is disabled,make it automatic and start. Click below to download NetSend tool
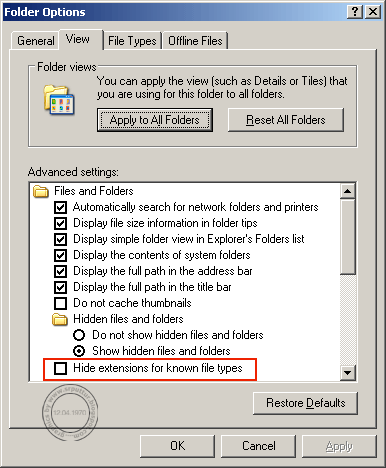
Recover Show Desktop icon

Show Desktop icon in the Quick launch becomes very essential while working on Meghdoot modules. Sometimes, accidentally, this icon may be got deleted. To re-create the Show desktop icon, follow these steps:
- Open notepad .
- Copy and paste the following text into the Notepad window:
[Shell]
Command=2
IconFile=explorer.exe,3
[Taskbar]
Command=ToggleDesktop
Command=2
IconFile=explorer.exe,3
[Taskbar]
Command=ToggleDesktop
- On the File menu, click Save As, and then save the file to your desktop as "Show desktop.scf". The Show desktop icon is created on your desktop.
4.Click and then drag the Show desktop icon to your Quick Launch toolbar.For doing this,first unlock the Taskbar.
5.Alternatively, Type "%appdata%\Microsoft\Internet Explorer\Quick Launch" in RUN dialog box and press Enter. It'll open Quick Launch folder. Paste the SCF file in this folder.
That's all.Your Show Desktop icon is restored.
Hint:
 Windows icon key + D will show you Desktop
 Meghdoot 7 : Point of Sale login error after upgradation
In some offices we are getting an error while login in to Point of Sale after upgradation of Meghdoot7.The error message is as shown
[Microsoft ][ODBC SQL SERVER DRIVER][SQL SERVER] Incorrect Syntax near '='
Solution:Please tick on Barcode on Inland Registered articles in the following option of Point of Sale Supervisor before upgradation.
My Office-->Environment.
If you are forgot to tick this before upgradation install old version of Point of Sale and tick the said entry and switch to new version.
Meghdoot 7 : Point of Sale Submit Account Error & MSDTC Services Error
Problem : After instollation SQL Express and M.M.7.0
1. RPC errore while submitting POS Submit account
2. Error Message like " MSDTC SERVICES IS NOT RUNNING "
Solution :1.
exec sp_serveroption @server='myserver', @optname='rpc', @optvalue='true'
exec sp_serveroption @server='myserver', @optname='rpc out', @optvalue='true'
Note: Replace 'myserver' with your servername in the above query.
2. Go to Services (Control Panel-- Administrative Tools--Services ) and then start the service 'Distributed Transaction Coordinator' (MSDTC) with start up type as 'Automatic' and Log On As 'Network Service' as shown in the attachment. Then execute the below mentioned Query relating to 'RPC' error to solve the problem.
 |
| Screen Shot - Distributed Transaction Coordinator' (MSDTC) |
Problem of Submit Account under Point of Sale.
First login to the system with Administration previleges and do the following
To allow the network transaction, you must enable MSDTC. To do this, follow these steps:
a. Click Start, and then click Run.
b. In the Run dialog box, type dcomcnfg.exe, and then click OK.
c. In the Component Services window, expand Component Services, expand Computers, and then expand My Computer.
d. Right-click My Computer, and then click Properties.
e. In the My Computer Properties dialog box, click Security Configuration on the MSDTC tab.
f. In the Security Configuration dialog box, click to select the Network DTC Access check box.
g. To allow the distributed transaction to run on this computer from a remote computer, click to select the Allow Inbound check box.
h. To allow the distributed transaction to run on a remote computer from this computer, click to select the Allow Outbound check box.
i. Under the Transaction Manager Communication group, click to select the No Authentication Required option.
j. In the Security Configuration dialog box, click OK.
k. In the My Computer Properties dialog box, click OK.
--
Note:
After following the above steps configure the servernames in treasury and Point of Sale.
If the problem is not solved configure the servernames using ip address of sql server
Procedure of how to feed Registration Closures / Transfers
Project Arrow Group contains the following forms:
1) Request Registration Closures
2) Request Registration Transfers
3) Request Registration Other Office
4) Status updation – Closures
5) Status Updation - Xfrd In
6) Status Updation - Xfrd Out
7) Status Updation - Other Office
8) Reports
1) Request Registration Closures
Step1: Select scheme >> SB/RD/MIS/NSS/PPF/TD/SCSS
Step2: Select Type of Request >> Account Closure / Claim Sanction / Claim Closure
Step3: Type Account Number
Clicking on 'Save' Button will generate the Request id.
2) Request Registration TransfersStep 1: Select 'Request From' >> Customer / DAK
In 'Request From' >> Customer Option
Step 2: Select scheme >> SB/RD/MIS/NSS/PPF/TD/ SCSS
Step 3: Select Type of Request >> Account Closure / Claim Sanction / Claim Closure
Step 4: Type Account Number
In 'Request From' >> DAK
Step 2: Select scheme >> SB/RD/MIS/NSS/PPF/TD/SCSS
Step 3: Select Type of Request >> Account Closure / Claim Sanction/ Claim Closure
Step 4: Type Account Number
Step 5: Type the 'AT No' and 'Date'
Clicking on 'Save' Button will generate the Request id.
3) Request Registration Other Office
Step1: Select scheme >> SB/RD/MIS/NSS/PPF/TD/ SCSS
Step2: 'Office where account Stands'
Step3: Type Account Number
Clicking on 'Save' Button will generate the Request id.
4) Status updation - Closures
Step 1: Type the 'Request id'
Details of Scheme, Type of Request, Account No, End Date & Time,
Remarks will be displayed.
Step 2: Verify the details and click on send button.
5) Status Updation - Xfrd In
Step1: Type the ’Request id’
Details of Scheme, Type of Request, Transfer Request by, Account No,
End Date & Time, will be displayed.
Step 2: Type Remarks
Step 3: Verify the details and click on the send button.
6) Status Updation - Xfrd Out
Step1: Type the ’Request id’
Details of Scheme, Type of Request, Transfer Request by,
Account No., End Date & Time, will be displayed.
Step 2: Type Remarks
Step 3: Verify the details and click on the send button.
7) Status Updation - Other Office
Step1: Type the ’Request id’
Details of Scheme, Type of Request, Office where account stands,
Account No, End Date & Time will be displayed.
Step 2: Type Remarks, RL No. and date
Step 3: Verify the details and click on the send button.
8) Reports
1. Transactions performed by a person.
2. SB branch KPIs
3. Customer Request status
IMO Booking and Delivery procedure
Instant Money Order Service (iMO) - the instant domestic Money transfer Service
INSTANT SAFE RELIABLE CONVENIENT Up to INR 50,000/-
India Post presents Instant Money Order (iMO), the instant on-line money transfer service that is instant, convenient,reliable and affordable.
IMO is an instant web based money transfer service through Post Offices (iMO Centre) in India between two resident individuals in Indian territory.
You can transfer money from INR 1,000/- to INR 50,000/- from designated iMO Post Offices.
It is simple to send and receive money.
iMO Booking Procedure
Fill up the “To Remit Payment” (TRP-1) form and submit it with money at iMO Post Office Counter. iMO Counter clerk after booking the iMO immediately will give a printed receipt with computer generated confidential 16 digit iMO number in a sealed condition. Even the 16 digit iMO number will not be known to booking clerk. Customer is required to tear off the seal and convey the confidential 16 digit iMO number to the receiver over phone, SMS, e-mail, etc. at his means and risk.
iMO delivery Procedure
Receiver to present the 16 digit iMO number at any designated iMO post office counter and will fill up and submit a “To Make Payment” (TMP-1) form along with a copy of his personal identity proof. Receiver can receive the payment in cash upto INR 50,000. He can also receive the payment through his post office savings bank account in the same iMO office.
Tariff
Remittance Commission INR
1000-5000 -> 150
5001-10000 -> 170
10001-15000 -> 190
15001-20000 -> 210
20001-25000 -> 230
25001-30000 -> 250
30001-35000 -> 270
35001-40000 -> 290
40001-45000 -> 310
45001-50000 -> 330
Photo Identity
1.Voter’s I-Card
2.PAN Card
3.Ration Card with photo of the receiver
4.Post Office Identity Card
5.Driving License
6.Passport.
7.School/college i.d8.Official i.d In case the Photo I.-Card has a valid expiry date the same is to be mentioned in ‘To Make Payment’ (TMP-1) Form
LIST OF STANDARDISED MESSAGES
(You can choose one standardized message from the list below with your iMO without additional charges)
01. Wish you a speedy recovery
02. Wish you all success in your studies
03. Hearty Congratulations on New Arrival
04. Our sincere condolence
05. Happy Birthday
06. Heartiest Congratulations on the Distinction conferred on you.
07. Best Wishes for Your Success.
08. Congratulations.
09. Pongal Greetings.
10. Grehapravesh Mubarak
11. Heartiest Gur Purab Greetings
12. Diwali Greetings
13. Heartiest Greetings on Nav-roz
14. Id Mubarak
15. Ganapati Festival Greetings
16. Dussehera Greetings
17. Christmas Greetings
18. Happy New Year
19. Holi Greetings
20. Many Happy Returns of the Day
21. Happy Anniversary
22. Best Wishes for a Pleasant Journey
23. Wedding Greetings
24. Wish you a successful trip abroad
25. Wedding Anniversary Greetings
26. Rakhi Greetings
27. Bhai Dooj Greetings
28. Onam Greetings
29. Bihu Greetings
30. Annaprassam Greetings
31. Mundan Greetings
32. Thread Ceremony Greetings
33. Chhat Puja Greetings
During MPCM working time running operatror does not shown in login as
During MPCM working time running operatror does not shown in login as
Many MPCM operator facing this problem, when he running his/her counter at afternoon the name of operator does not shown in LOGIN AS. This happened due to --> In the morning when SUPERVIOSR doen the WORK ALLOCATION to operator POINT OF SALE automatically adjusted the 8 hrs. duty to operators & OPERATOR start his work, but when his duty time exceeded the adjusted duty hours, then his name does not shown in the LOGIN AS. So for this go to SUPERVIOSR --> WORK ALLOCATION --> MODIFY and select the operator time and increase the TO TIME. Now hir/her name again shown in the LOGIN AS.
Otherwise in the morning when SUPERVIOSR done the WORK ALLOCATION that time he select the operator name and change the TO TIME. (i.e. increase the duty more than 8 hrs. )
Error of COUNTER NUMBER ALLRADY ALLOTED TO OTHER USER
Error of COUNTER NUMBER ALLRADY ALLOTED TO OTHER USER
Many time operator wrongly selected same counter number and try to done the WORK ALLOCATION. Otherwise MPCM shown the error THIS COUNTER NUMBER ALLRADY ALLOTTED TO OTHER USER. But actually there is no any OPERATOR running the said coutner number. For this error go to --> SUPERVISOR --> TOOLS --> DELETE INACTIVE COUNTER --> here type that the said coutner number and click on ok. Now clik on WORK ALLOCATION AND SELECT THE SAID COUNTER --> & SELECTE MPCM OPERATOR NAME .
PROBLEM IS SET RIGHT HERE.
Solution for Error in loading DLL.doc
Dear System Administrator,
Re-Register the required Dao360.dll file and the Msado15.dll file
You may have to register the Dao360.dll file and the Msado15.dll file by using the Regsvr32.exe program. To do this, follow these steps:
You may have to register the Dao360.dll file and the Msado15.dll file by using the Regsvr32.exe program. To do this, follow these steps:
1. Click Start, and then click Run.
2. In the Run dialog box, type the following commands in the Open box, and then click OK:
Regsvr32.exe "<> "
Regsvr32.exe "<> "
The <> placeholder is the absolute path of the Dao360.dll file.
The<> placeholder is the absolute path of the Msado15.dll file.
The following examples show how you may specify an absolute path:
Regsvr32.exe "C:\Program Files\Common Files\Microsoft Shared\DAO\Dao360.dll"
Regsvr32.exe "C:\Program Files\Common Files\system\ado\Msado15.dll"
If the Dao360.dll file is successfully registered, you receive a message that is similar to the following message:
Regsvr32.exe "<
Regsvr32.exe "<
The <
The<
The following examples show how you may specify an absolute path:
Regsvr32.exe "C:\Program Files\Common Files\Microsoft Shared\DAO\Dao360.dll"
Regsvr32.exe "C:\Program Files\Common Files\system\ado\Msado15.dll"
If the Dao360.dll file is successfully registered, you receive a message that is similar to the following message:
DllRegisterServer in C:\Program Files\Common Files\Microsoft Shared\DAO\Dao360.dll succeeded.
If the Msado15.dll file is successfully registered, you receive a message that is similar to the following message:
DllRegisterServer in C:\Program Files\Common Files\system\ado\Msado15.dll succeeded.
3. Click OK.
Do not issue emo after same bet taken retun
Date: 16.05.2011
It is noticed that after taking returns delivery PA again issue the emo same beat. But when he try to send that emo to treasury module the said eMO does not shown on said option. Hence PTC advice that ....... Please do not issue eMO to a beat after taking returns for the beat.
How to issue yestereday booked local articels in postman module
First ensured that the Meghdoot modules 6.6 version is upgraded with Meghdoot Enhancement in your post offices
1. Book the local destination artless in Point of sale with the correct local pincode and destination.
2. After completion work of counter, receive the all counter data in Dispatch module
3. But here the local articles does not shown with other articles in dispatch modules. ( These articles are directly moved in postman module )
4. Next day when u are doing the day begin of POSTMAN module --> select the option of -->
Fetch from counter --> Entered the yesterday date in from and to field and click on OK
button ---> Click on YES button for confirmation & noticed that the number of artifices ( i.e.
Register, Parcel .... ) are received.
5. Go to postman operator menu ---> Select the post sorting --> now change the radio button from RECEIPT to COUNTER and click on click on Article Number option. See here the yesterday booked all local articles are listed. Same it is select the beat number and click on
OK button . The said local artifices are listed in that postman beat.
Sanchay Post Installation in Windows-7
Installation in Windows-7
1.
Fresh installation of Sanchay Post in systems running Windows 7 and Sql Server 2008 R2 Express.
While installing SQL Express Edition, select default instance and security as 'Mixed Mode Authentication'.
1) Install Sanchay Post Version 6.5 (from Sanchay Post new sites CD) in the server.
2) Create the databases using 'Sanchay Post >> Database Operations' option.
3) Run 'Sanchay Post >> Database Operations >> Patch for SPUser'
4) Run 'Sanchay Post >> Database Operations >> BPRO Updates'
5) Run 'Sanchay Post >> Database Operations >> Patch for negative list'
6) Login as 'SUPERUSER' in online module for the first time using default login (BPRO/BPROP)
7) Create new users and enter office details in 'PO Name and address' & 'Set default PO Name' forms.
8) Upgrade to Version 6.5R2 as per the instructions given in the website.
9) Check for missing tables / upgradation status using DBAnalyzer with latest update.
Subscribe to:
Posts (Atom)